DSPy: From Prompt Engineering to Context Engineering
Discover how DSPy revolutionizes LLM development by moving beyond brittle manual prompts to declarative, optimized context engineering. Learn Signatures, Modules, and how to automatically improve your AI programs.
The era of simple “prompt engineering” is evolving. Manually crafting large, brittle prompts is no longer effective or scalable. The next step is context engineering, and DSPy is the framework built to handle it.
As Tobi Lutke, CEO of Shopify, put it: “DSPy is my context engineering tool of choice.”
Why DSPy? The Problem with Prompts
There’s a famous programming joke:
“Some people, when confronted with a problem, think ‘I know, I’ll use regular expressions.’ Now they have two problems.”
This analogy is perfect for manual prompting. What started as a simple solution has created a new set of complex problems.
The Gift & The Curse of Prompting
😁 Prompts are Great!
- Accessible: Anyone can describe program functions and tasks in natural language.
- Fast: Prompts can be written quickly and easily to get an initial result.
- Self-Documenting: The prompt itself describes what the program is supposed to do.
🫣 Prompts are Terrible!
- Brittle: Prompts perform differently for different models (e.g., GPT-4o vs. Llama 3).
- Unstable: Prompts can even perform differently on the same model with minor changes.
- Unmanageable: Prompts grow to become a massive collection of edge cases, examples, and formatting instructions.
- Monolithic: A single prompt string often mixes the task definition, context, examples, and formatting instructions, making it impossible to manage.
The DSPy Solution
DSPy (Declarative Self-improving Language Programs) is a framework that solves these problems by changing the way we build with LLMs.
- Write Tasks, Not Prompts: You define explicit, typed inputs and outputs for a job. You focus on what the task is, not the how of a specific brittle prompt string.
- Optimize Your Functions: DSPy can continuously improve your program’s prompts and weights using a variety of optimization algorithms.
- Embrace Model Portability: You can rapidly port your function to the next great model and use the same optimizer to find the best prompt for that new model.
Deconstructing the Prompt
To understand why DSPy is needed, look at what a “good” manual prompt contains. This example from OpenAI’s GPT-4.1 Prompting Guide breaks down a single 1,800-token prompt:
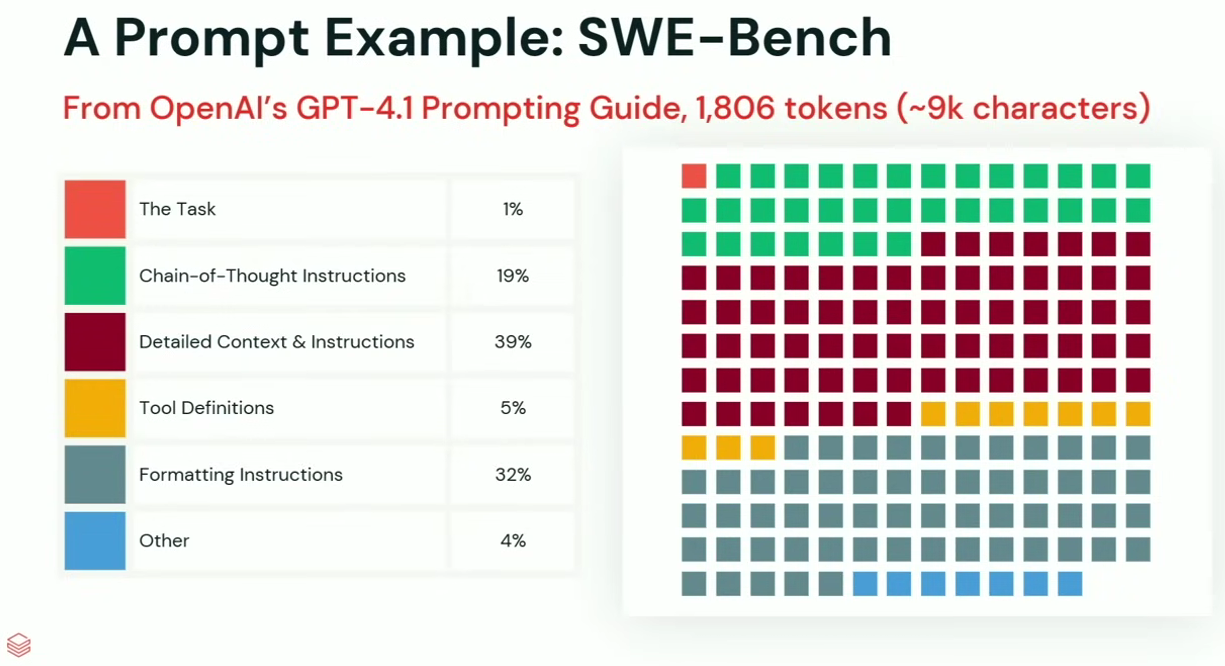 From OpenAI’s GPT-4.1 Prompting Guide, 1,806 tokens (~9k characters)
- The Task: 1%
- Chain-of-Thought Instructions: 19%
- Detailed Context & Instructions: 39%
- Tool Definitions: 5%
- Formatting Instructions: 32%
- Other: 4%
A tiny fraction is the actual task. The rest is all manual “context engineering” that is brittle and model-specific. DSPy helps you manage this by separating concerns.
Core Components of DSPy
DSPy organizes your program into two main components: Signatures and Modules.
1. Signatures (Defining the Task)
A Signature is a declarative way to define the task you want to perform. It focuses purely on the inputs and outputs, not the prompt.
It is made of three parts:
- Docstring: A high-level description of the task.
- Input Fields: The data you will provide to the model.
- Output Fields: The data you expect the model to return.
Connecting Signatures to Prompt Components:
- The Docstring in your Signature replaces the manual
The Taskportion of a prompt. - The Input & Output Fields tell DSPy what the
Detailed ContextandFormatting Instructionsshould be. The framework and optimizer build these for you.
Here is an example of a Signature for a program that checks if two place descriptions refer to the same location:
1
2
3
4
5
6
7
8
9
10
11
12
13
14
15
16
17
18
19
import dspy
from pydantic import BaseModel

class Place(BaseModel):
    address: str = dspy.InputField()
    name: str = dspy.InputField()

class PlaceMatcher(dspy.Signature):
    """Determine if two points of interest refer to the same place."""

    place_one: Place = dspy.InputField()
    place_two: Place = dspy.InputField()
    match: bool = dspy.OutputField()

# After defining the signature, you can use it in a module
matcher = dspy.Predict(PlaceMatcher)

# And load optimized prompts for it
matcher.load("path/optimized.json")
2. Modules (Executing the Task)
Modules are the strategies for executing a Signature. They control how the LLM is used to get from the inputs to the outputs.
There are many built-in modules you can use:
Predict: The simplest module. Takes inputs and produces outputs. Use for simple, one-shot tasks like classification or quick Q&A.ChainOfThought: Guides the LLM to “think step by step” before giving the final answer. Use when a task requires reasoning, calculation, or intermediate steps.ProgramOfThought: A more advanced module where the LLM generates a program (e.g., Python code) to solve a problem. Use for complex math, symbolic reasoning, or tasks that need a verifiable process.ReAct: (Reason + Act) A module that can use external tools (like a search engine). It reasons about what it needs, uses a tool, gets new information, and reasons again. Use when the task requires up-to-date or external information.MultiChainComparison: Generates multiple answers (e.g., usingChainOfThoughtthree times) and then has the LLM compare and select the best one. Use to improve reliability and reduce errors.ChainOfThoughtWithHint: AChainOfThoughtmodule that can be given a hint (like a related question/answer pair) to guide its reasoning.Majority: A voting module. It runs the same module multiple times (e.g., with different settings or on a finetuned model) and takes the majority vote for the final answer. Use for robust classification.Refine: Takes an initial answer (from another module) and iteratively improves it. Use when a first draft needs to be “polished” based on a set of rules or feedback.
DSPy in Action: A Simple Flow
For a basic “Hello World,” you don’t even need a full Signature class. You can just define the task as a string.
This simple flow shows the core of DSPy:
- Connect to your LLM: DSPy uses
litellmbehind the scenes, so it can connect to hundreds of models (OpenAI, Llama, Gemini, etc.) with the same API. - Define a Module & Signature:
dspy.Predictis the module, and'question -> answer'is the simple signature. - Run the Program: You just call your module
qaas a normal Python function.
1
2
3
4
5
6
7
8
9
10
11
12
13
14
import dspy

# 1. Connect to your LLM
# (DSPy uses litellm to support OpenAI, Llama, Mistral, etc.)
lm = dspy.LM('openai/gpt-4o-mini', api_key='YOUR_OPENAI_API_KEY')
dspy.configure(lm=lm)

# 2. Define a module (Predict) and assign it a signature.
qa = dspy.Predict('question -> answer')

# 3. Run with the default LLM
response = qa(question="Why is the sky blue?")

print(response.answer)
The Real Power: Optimizing Your Prompt
This is where DSPy becomes a “context engineering” tool. Instead of you manually tuning the prompt, you let an optimizer do it for you.
To optimize a DSPy program, you generally need three things:
- A Validation Function (Metric): Your “judge.” A simple Python function that checks if the LLM’s output (
pred) is correct according to your ground-truth example (example). - A Training Set: A small set of high-quality input/output examples (10-20 is often enough to start).
- An Optimizer (Teleprompter): The algorithm that tries different prompts and strategies to maximize the metric.
dspy.MIPROv2is a powerful, general-purpose optimizer.
The Optimization Flow
This code shows how you compile (optimize) a program.
1
2
3
4
5
6
7
8
9
10
11
12
13
14
15
16
17
18
19
20
# 1. Define your validation metric (the "judge")
def validate_match(example, pred, trace=None):
    return example.match == pred.match

# Import the "teleprompter" (optimizer)
from dspy.teleprompt import *

# 2. Define your LLMs: one for generating prompts, one for the task
promp_lm = dspy.LM('openai/gpt-4.1', api_key='your_openai_api_key')
task_model = lm # Use the model we configured earlier

# 3. Instantiate the optimizer (MIPROv2)
tp = dspy.MIPROv2(metric=validate_match, auto="light",
                  prompt_model=promp_lm, task_model=task_model)

# 4. Compile your program (matcher) with a training set
optimized_matcher = tp.compile(matcher, trainset=trainset)

# 5. Save the optimized program (prompts and all) to a JSON file
optimized_matcher.save("optimized_matcher_full_light.json")
What Optimization Delivers
When you run tp.compile(), the optimizer generates, tests, and refines prompts to find the one that gets the best score on your training set. The results are dramatic:
Using the same optimizer and training dataset, DSPy can significantly improve the performance of even small, open-source models:
- Qwen 3 0.6B: 60.7% → 82.0%
- Llama 3.2 1B: 84.0% → 91.0%
- Phi-4-Mini 3.8B: 86.0% → 95.0%
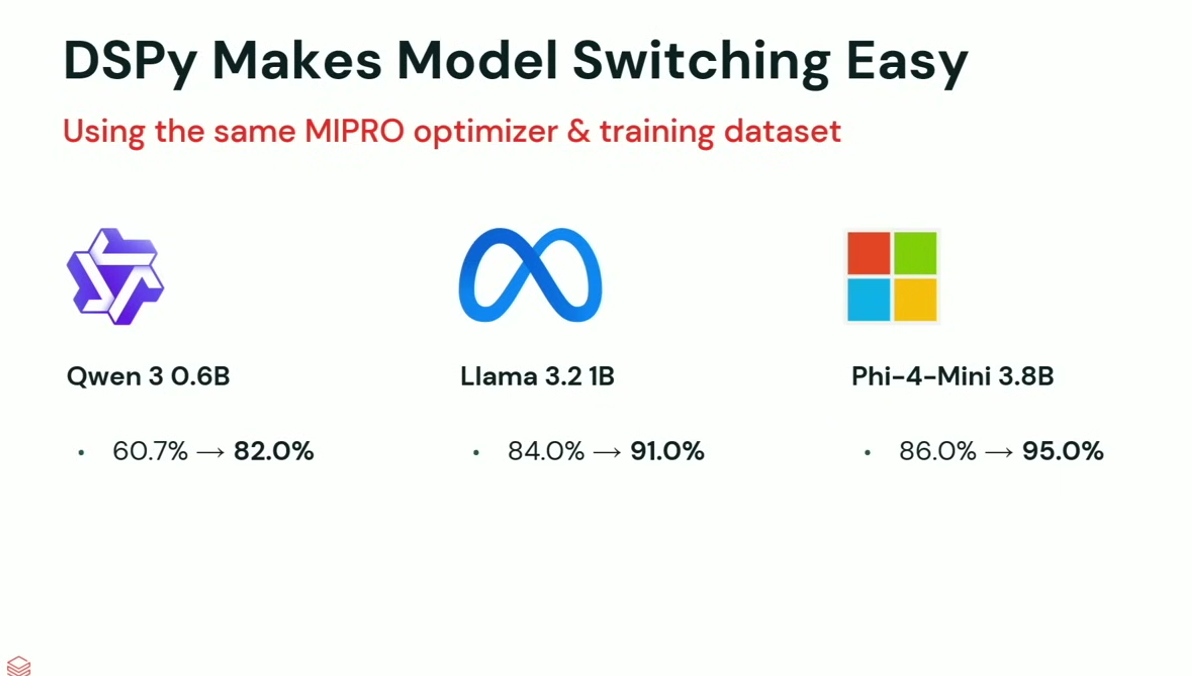 Using the same MIPRO optimizer & training dataset across different models
This optimization is achieved with minimal code, and the final optimized program (a JSON file) can be versioned, tracked in git, and loaded directly into production.
Final Resources
- Databricks Data+AI Summit Talk: DSPy: The Art and Science of Prompting LLMs
- Weaviate Podcast: DSPy - The framework for programming, not prompting LLMs
- Official DSPy GitHub: github.com/stanfordnlp/dspy (Includes documentation, tutorials, and examples)